مطالب
استفاده از EF7 با پایگاه داده SQLite تحت NET Core. به کمک Visual Studio Code
در این مقاله سعی داریم مراحل نوشتن و اجرای یک برنامه‌ی ساده را تحت NET Core. و با بهره گیری از دیتابیس SQLite و EF7، دنبال کنیم. همچنین از آنجایی‌که NET Core. به صورت چندسکویی طراحی شده‌است و تحت لینوکس و مکینتاش هم قابل اجراست، در نتیجه مناسب دیدم که ابزار نوشتن این پروژه‌ی ساده نیز قابلیت چندسکویی داشته و تحت لینوکس و مکینتاش نیز قابل اجرا باشد. در نتیجه به جای Visual Studio در این مقاله از Visual Studio Code استفاده شده است.

ابزارهای پیش نیاز:
  1. Visual Studio Code
  2. .NET Core
در اولین قدم، برنامه‌ی متن باز Visual Studio Code را از اینجا دانلود و نصب کنید. برنامه‌ی Visual Studio Code که در ادامه‌ی فعالیت‌های جدید متن باز مایکروسافت به بازار عرضه شده است، سریع، سبک و کاملا قابل توسعه و سفارشی سازی است و از اکثر زبان‌های معروف پشتیبانی می‌کند.
در قدم بعدی، شما باید NET Core. را از اینجا (64 بیتی) دانلود و نصب کنید.

 .NET Core چیست؟
NET Core. در واقع پیاده سازی بخشی از NET. اصلی است که به صورت متن باز در حال توسعه می‌باشد و بر روی لینوکس و مکینتاش هم قابل اجراست. موتور اجرای دات نت کامل CLR نام دارد و NET Core. نیز دارای موتور اجرایی CoreCLR است و شامل فریمورک CoreFX می‌باشد.

در حال حاضر شما می‌توانید با استفاده از NET Core. برنامه‌های کنسولی و تحت وب با ASP.NET 5 بنویسید و احتمالا در آینده می‌توان امیدوار بود که از ساختارهای پیچیده‌تری مثل WPF نیز پشتیبانی کند.

پس از آنکه NET Core. را دانلود و نصب کردید، جهت شروع پروژه، یک پوشه را در یکی از درایوها ساخته (در این مثال E:\Projects\EF7-SQLite-NETCore) و Command prompt را در آنجا باز کنید. سپس دستورات زیر را به ترتیب اجرا کنید:

dotnet new
dotnet restore
dotnet run

دستور dotnet new یک پروژه‌ی ساده‌ی Hello World را در پوشه‌ی جاری ایجاد می‌کند که حاوی فایل‌های زیر است:
  • NuGet.Config (این فایل، تنظیمات مربوط به نیوگت را جهت کشف و دریافت وابستگی‌های پروژه، شامل می‌شود)
  •  Program.cs (این فایل سی شارپ حاوی کد برنامه است)
  • project.json (این فایل حاوی اطلاعات پلتفرم هدف و لیست وابستگی‌های پروژه است)

دستور dotnet restore بر اساس لیست وابستگی‌ها و پلتفرم هدف، وابستگی‌های لازم را از مخزن نیوگت دریافت می‌کند. (در صورتی که در هنگام اجرای این دستور با خطای NullReferenceException مواجه شدید از دستور dnu restore استفاده کنید. این خطا در گیت هاب در حال بررسی است)

دستور dotnet run هم سورس برنامه را کامپایل و اجرا می‌کند. در صورتی که پیام Hello World را مشاهده کردید، یعنی برنامه‌ی شما تحت NET Core. با موفقیت اجرا شده است.

توسعه‌ی پروژه با Visual Studio Code

در ادامه، قصد داریم پروژه‌ی HelloWorld را تحت Visual Studio Code باز کرده و تغییرات بعدی را در آنجا اعمال کنیم. پس از باز کردن Visual Studio Code از منوی File گزینه‌ی Open Folder را انتخاب کنید و پوشه‌ی حاوی پروژه (EF7-SQLite-NETCore) را انتخاب کنید. اکنون پروژه‌ی شما تحت VS Code باز شده و قابل ویرایش است.

سپس از لیست فایل‌های پروژه، فایل project.json را باز کرده و در بخش "dependencies" یک ردیف را برای EntityFramework.SQLite به صورت زیر اضافه کنید. به محض افزودن این خط در project.json و ذخیره‌ی آن، در صورتیکه قبلا این وابستگی دریافت نشده باشد، Visual Studio Code با نمایش یک هشدار در بالای برنامه به شما امکان دریافت اتوماتیک این وابستگی را می‌دهد. در نتیجه کافیست دکمه‌ی Restore را زده و منتظر شوید تا وابستگی EntityFramework.SQLite از مخزن ناگت دانلود و برای پروژه‌ی شما تنظیم شود.

"EntityFramework.SQLite": "7.0.0-rc1-final"

دریافت اتوماتیک وابستگی‌ها توسط Visual Studio Code


پس از کامل شدن این مرحله، در پروژه‌های بعدی تمام ارجاعات به وابستگی‌های دریافت شده، از طریق مخزن موجود در سیستم خود شما، برطرف خواهد شد و نیاز به دانلود مجدد وابستگی‌ها نیست.

اکنون همه‌ی موارد، جهت توسعه‌ی پروژه آماده است. ماوس خود را بر روی ریشه‌ی پروژه در VS Code قرار داده و New Folder را انتخاب کنید و نام Models را برای آن تایپ کنید. این پوشه قرار است مدل کلاس‌های پروژه را شامل شود. در اینجا ما یک مدل به نام Book داریم و نام کانتکست اصلی پروژه را هم LibraryContext گذاشته‌ایم.

بر روی پوشه‌ی Models راست کلیک کرده و گزینه‌ی New File را انتخاب کنید. سپس فایل‌های Book.cs و LibraryContext.cs را ایجاد کرده و کدهای زیر را برای مدل و کانتکست، در درون این دو فایل قرار دهید.

Book.cs

namespace Models
{
    public class Book
    {
        public int ID { get; set; }
        public string Title { get; set; }
        public string Author{get;set;}
        public int PublishYear { get; set; }
    }
}
LibraryContext.cs
using Microsoft.Data.Entity;
using Microsoft.Data.Sqlite;

namespace Models
{
    public class LibraryContext : DbContext
    {
        protected override void OnConfiguring(DbContextOptionsBuilder optionsBuilder)
        {
            var connectionStringBuilder = new SqliteConnectionStringBuilder { DataSource = "test.db" };
            var connectionString = connectionStringBuilder.ToString();
            var connection = new SqliteConnection(connectionString);
            optionsBuilder.UseSqlite(connection);
        }
        public DbSet<Book> Books { get; set; }
    }
}
در فایل Book.cs یک مدل ساده به نام Book داریم که حاوی اطلاعات یک کتاب است. فایل LibraryContext.cs نیز حاوی کلاس LibraryContext است که یک مجموعه از کتاب‌ها را با نام Books نگهداری می‌کند. در متد OnConfiguring تنظیمات لازم را جهت استفاده از دیتابیس SQLite با نام test.db، قرار داده‌ایم که البته این کد را در پروژه‌های کامل می‌توان در خارج از LibraryContext قرار داد تا بتوان مسیر ذخیره سازی دیتابیس را کنترل و قابل تنظیم کرد.

در قدم آخر هم کافیست که فایل Program.cs را تغییر دهید و مقادیری را در دیتابیس ذخیره و بازخوانی کنید.
Program.cs
using System;
using Models;

namespace ConsoleApplication
{
    public class Program
    {
        public static void Main(string[] args)
        {
            Console.WriteLine("EF7 + Sqlite with the taste of .NET Core");

            try
            {
                using (var context = new LibraryContext())
                {
                    context.Database.EnsureCreated();

                    var book1 = new Book()
                    {
                        Title = "Adaptive Code via C#: Agile coding with design patterns and SOLID principles ",
                        Author = "Gary McLean Hall",
                        PublishYear = 2014
                    };

                    var book2 = new Book()
                    {
                        Title = "CLR via C# (4th Edition)",
                        Author = "Jefrey Ritcher",
                        PublishYear = 2012
                    };

                    context.Books.Add(book1);
                    context.Books.Add(book2);

                    context.SaveChanges();

                    ReadData(context);
                }

                Console.WriteLine("Press any key to exit ...");
                Console.ReadKey();
            }
            catch (Exception ex)
            {
                Console.WriteLine($"An exception occured: {ex.Message}\n{ex.StackTrace}");
            }
        }

        private static void ReadData(LibraryContext context)
        {
            Console.WriteLine("Books in database:");
            foreach (var b in context.Books)
            {
                Console.WriteLine($"Book {b.ID}");
                Console.WriteLine($"\tName: {b.Title}");
                Console.WriteLine($"\tAuthor: {b.Author}");
                Console.WriteLine($"\tPublish Year: {b.PublishYear}");
                Console.WriteLine();
            }
        }
    }
}
در فایل Program.cs جهت تست پروژه، از روی کلاس Book دو نمونه ساخته و آن‌ها را به دیتابیس افزوده و ذخیره می‌کنیم و در انتها، اطلاعات تمامی کتاب‌های موجود در دیتابیس را با جزییات نمایش می‌دهیم.

جهت اجرای برنامه کافیست Command prompt را در آدرس پروژه باز کرده و دستور dotnet run را اجرا کنید. پروژه‌ی شما کامپایل و اجرا می‌شود و خروجی مشابه زیر را مشاهده خواهید کرد. اگر برنامه را مجددا اجرا کنید، به جای دو کتاب اطلاعات چهار کتاب نمایش داده خواهد شد؛ چرا که در هر مرحله اطلاعات دو کتاب در دیتابیس درج می‌شود.

.NET Core + EF7 + SQLite

اگر به پوشه‌ی bin که در پوشه‌ی پروژه ایجاد شده است، نگاهی بیندازید، خبری از فایل باینری نیست. چرا که در لحظه‌، تولید و اجرا شده است. جهت build کردن پروژه و تولید فایل باینری کافیست دستور dotnet build را اجرا کنید، تا فایل باینری در پوشه‌ی bin ایجاد شود.

جهت انتشار برنامه می‌توانید دستور dotnet publish را اجرا کنید. این دستور نه تنها برنامه، که تمام وابستگی‌های مورد نیاز آن را برای اجرای در یک پلتفرم خاص تولید می‌کند. برای مثال بعد از اجرای این دستور یک پوشه‌ی win7-x64 حاوی 211 فایل در مجموع تولید شده است که تمامی وابستگی‌های این پروژه را شامل می‌شود.

Publishing .NET Core app

در واقع این پوشه تمام وابستگی‌های مورد نیاز پروژه را همراه خود دارد و در نتیجه جهت اجرای این برنامه برخلاف برنامه‌های معمولی دات نت، دیگر نیازی به نصب هیچ وابستگی مجزایی نیست و حتی پروژه‌های نوشته شده تحت NET Core. را می‌توانید در سیستم‌های عامل‌های دیگری مثل لینوکس و مکینتاش و یا  Windows IoT بر روی سخت افزار Raspberry Pi 2 هم اجرا کنید.

جهت مطالعه‌ی بیشتر:
اشتراک‌ها
استانداردهای جدید اعتبارسنجی کلمات عبور
Verifiers and CSPs SHALL NOT impose other composition rules (e.g., requiring mixtures of different character types) for passwords.
Verifiers and CSPs SHALL NOT require users to change passwords periodically. However, verifiers SHALL force a change if there is evidence of compromise of the authenticator.
Verifiers and CSPs SHALL NOT permit the subscriber to store a hint that is accessible to an unauthenticated claimant.
Verifiers and CSPs SHALL NOT prompt subscribers to use knowledge-based authentication (KBA) (e.g., “What was the name of your first pet?”) or security questions when choosing passwords.
اشتراک‌ها
آیا باید همه اطلاعات در وب رمز شود ؟

  Should All Web Traffic Be Encrypted? The prevalence of free, open WiFi has made it rather easy for a WiFi eavesdropper to steal your identity cookie for the websites you visit while you're connected to that WiFi access point   

آیا باید همه اطلاعات در وب رمز شود ؟
اشتراک‌ها
تزریق وابستگی در ASP.NET 5 - یک گام عمیق تر
In this post I will dive a little bit deeper than this MSDN post; here we will examine the main interfaces involved, have a small peek inside on how things are running, and explain what it means really to switch to your IoC container of choice
تزریق وابستگی در ASP.NET 5 - یک گام عمیق تر
اشتراک‌ها
v1.22.0 افزونه‌ی #C مخصوص Visual Studio Code منتشر شد

If you enable our semantic highlighting support then, be sure to try out the included Visual Studio 2019 Light and Dark themes. TypeScript looks great in it too!

NOTE: For semantic highlighting ensure that editor.semanticHighlighting.enabled and csharp.semanticHighlighting.enabled are set to true. 

v1.22.0 افزونه‌ی #C مخصوص Visual Studio Code منتشر شد
اشتراک‌ها
پروژه Big Rig
Big Rig exists to try and give you extended information on what your page was doing during critical RAIL actions, in particular Loading, Responding and Animating. 
پروژه Big Rig
مطالب
استفاده از OpenID در وب سایت جهت احراز هویت کاربران
قبلا شرح مختصری در زمینه OpenID در اینجا گفته شد.
حال می‌خواهیم این امکان را در پروژه خود بکار ببریم، جهت این کار باید ابتدا یک پروژه ایجاد کرده و از کتابخانه‌های سورس باز موجود استفاده کرد.
1- ابتدا در ویژوال استودیو یا هر نرم افزار دیگر یک پروژه MVC ایجاد نمایید.

2- نوع Internet Application و برای View Engine سایت Razor را انتخاب نمایید.

3- کتابخانه DotNetOpenId سورس باز را می‌توانید مستقیما از این آدرس دانلود نموده یا از طریق Package Manager Console و با نوشتن Install-Package DotNetOpenAuth به صورت آنلاین این کتابخانه را نصب نمایید.
4- مدل‌های برنامه را مانند زیر ایجاد نمایید
using System;
using System.Collections.Generic;
using System.ComponentModel.DataAnnotations;
using System.Globalization;
using System.Security.Cryptography;
using System.Text;
using System.Web.Mvc;
using System.Web.Security;

namespace OpenIDExample.Models
{
    #region Models

    public class ChangePasswordModel
    {
        [Required]
        [DataType(DataType.Password)]
        [Display(Name = "Current password")]
        public string OldPassword { get; set; }

        [Required]
        [ValidatePasswordLength]
        [DataType(DataType.Password)]
        [Display(Name = "New password")]
        public string NewPassword { get; set; }

        [DataType(DataType.Password)]
        [Display(Name = "Confirm new password")]
        [Compare("NewPassword", ErrorMessage = "The new password and confirmation password do not match.")]
        public string ConfirmPassword { get; set; }
    }

    public class LogOnModel
    {
        [Display(Name = "OpenID")]
        public string OpenID { get; set; }

        [Required]
        [Display(Name = "User name")]
        public string UserName { get; set; }

        [Required]
        [DataType(DataType.Password)]
        [Display(Name = "Password")]
        public string Password { get; set; }

        [Display(Name = "Remember me?")]
        public bool RememberMe { get; set; }
    }

    public class RegisterModel
    {
        [Display(Name = "OpenID")]
        public string OpenID { get; set; }

        [Required]
        [Display(Name = "User name")]
        public string UserName { get; set; }

        [Required]
        [DataType(DataType.EmailAddress)]
        [Display(Name = "Email address")]
        public string Email { get; set; }

        [Required]
        [ValidatePasswordLength]
        [DataType(DataType.Password)]
        [Display(Name = "Password")]
        public string Password { get; set; }

        [DataType(DataType.Password)]
        [Display(Name = "Confirm password")]
        [Compare("Password", ErrorMessage = "The password and confirmation password do not match.")]
        public string ConfirmPassword { get; set; }
    }

    #endregion Models

    #region Services

    // The FormsAuthentication type is sealed and contains static members, so it is difficult to
    // unit test code that calls its members. The interface and helper class below demonstrate
    // how to create an abstract wrapper around such a type in order to make the AccountController
    // code unit testable.

    public interface IMembershipService
    {
        int MinPasswordLength { get; }

        bool ValidateUser(string userName, string password);

        MembershipCreateStatus CreateUser(string userName, string password, string email, string OpenID);

        bool ChangePassword(string userName, string oldPassword, string newPassword);

        MembershipUser GetUser(string OpenID);
    }

    public class AccountMembershipService : IMembershipService
    {
        private readonly MembershipProvider _provider;

        public AccountMembershipService()
            : this(null)
        {
        }

        public AccountMembershipService(MembershipProvider provider)
        {
            _provider = provider ?? Membership.Provider;
        }

        public int MinPasswordLength
        {
            get
            {
                return _provider.MinRequiredPasswordLength;
            }
        }

        public bool ValidateUser(string userName, string password)
        {
            if (String.IsNullOrEmpty(userName)) throw new ArgumentException("Value cannot be null or empty.", "userName");
            if (String.IsNullOrEmpty(password)) throw new ArgumentException("Value cannot be null or empty.", "password");

            return _provider.ValidateUser(userName, password);
        }

        public Guid StringToGUID(string value)
        {
            // Create a new instance of the MD5CryptoServiceProvider object.
            MD5 md5Hasher = MD5.Create();
            // Convert the input string to a byte array and compute the hash.
            byte[] data = md5Hasher.ComputeHash(Encoding.Default.GetBytes(value));
            return new Guid(data);
        }

        public MembershipCreateStatus CreateUser(string userName, string password, string email, string OpenID)
        {
            if (String.IsNullOrEmpty(userName)) throw new ArgumentException("Value cannot be null or empty.", "userName");
            if (String.IsNullOrEmpty(password)) throw new ArgumentException("Value cannot be null or empty.", "password");
            if (String.IsNullOrEmpty(email)) throw new ArgumentException("Value cannot be null or empty.", "email");

            MembershipCreateStatus status;
            _provider.CreateUser(userName, password, email, null, null, true, StringToGUID(OpenID), out status);
            return status;
        }

        public MembershipUser GetUser(string OpenID)
        {
            return _provider.GetUser(StringToGUID(OpenID), true);
        }

        public bool ChangePassword(string userName, string oldPassword, string newPassword)
        {
            if (String.IsNullOrEmpty(userName)) throw new ArgumentException("Value cannot be null or empty.", "userName");
            if (String.IsNullOrEmpty(oldPassword)) throw new ArgumentException("Value cannot be null or empty.", "oldPassword");
            if (String.IsNullOrEmpty(newPassword)) throw new ArgumentException("Value cannot be null or empty.", "newPassword");

            // The underlying ChangePassword() will throw an exception rather
            // than return false in certain failure scenarios.
            try
            {
                MembershipUser currentUser = _provider.GetUser(userName, true /* userIsOnline */);
                return currentUser.ChangePassword(oldPassword, newPassword);
            }
            catch (ArgumentException)
            {
                return false;
            }
            catch (MembershipPasswordException)
            {
                return false;
            }
        }

        public MembershipCreateStatus CreateUser(string userName, string password, string email)
        {
            throw new NotImplementedException();
        }
    }

    public interface IFormsAuthenticationService
    {
        void SignIn(string userName, bool createPersistentCookie);

        void SignOut();
    }

    public class FormsAuthenticationService : IFormsAuthenticationService
    {
        public void SignIn(string userName, bool createPersistentCookie)
        {
            if (String.IsNullOrEmpty(userName)) throw new ArgumentException("Value cannot be null or empty.", "userName");

            FormsAuthentication.SetAuthCookie(userName, createPersistentCookie);
        }

        public void SignOut()
        {
            FormsAuthentication.SignOut();
        }
    }

    #endregion Services

    #region Validation

    public static class AccountValidation
    {
        public static string ErrorCodeToString(MembershipCreateStatus createStatus)
        {
            // See http://go.microsoft.com/fwlink/?LinkID=177550 for
            // a full list of status codes.
            switch (createStatus)
            {
                case MembershipCreateStatus.DuplicateUserName:
                    return "Username already exists. Please enter a different user name.";

                case MembershipCreateStatus.DuplicateEmail:
                    return "A username for that e-mail address already exists. Please enter a different e-mail address.";

                case MembershipCreateStatus.InvalidPassword:
                    return "The password provided is invalid. Please enter a valid password value.";

                case MembershipCreateStatus.InvalidEmail:
                    return "The e-mail address provided is invalid. Please check the value and try again.";

                case MembershipCreateStatus.InvalidAnswer:
                    return "The password retrieval answer provided is invalid. Please check the value and try again.";

                case MembershipCreateStatus.InvalidQuestion:
                    return "The password retrieval question provided is invalid. Please check the value and try again.";

                case MembershipCreateStatus.InvalidUserName:
                    return "The user name provided is invalid. Please check the value and try again.";

                case MembershipCreateStatus.ProviderError:
                    return "The authentication provider returned an error. Please verify your entry and try again. If the problem persists, please contact your system administrator.";

                case MembershipCreateStatus.UserRejected:
                    return "The user creation request has been canceled. Please verify your entry and try again. If the problem persists, please contact your system administrator.";

                default:
                    return "An unknown error occurred. Please verify your entry and try again. If the problem persists, please contact your system administrator.";
            }
        }
    }

    [AttributeUsage(AttributeTargets.Field | AttributeTargets.Property, AllowMultiple = false, Inherited = true)]
    public sealed class ValidatePasswordLengthAttribute : ValidationAttribute, IClientValidatable
    {
        private const string _defaultErrorMessage = "'{0}' must be at least {1} characters long.";
        private readonly int _minCharacters = Membership.Provider.MinRequiredPasswordLength;

        public ValidatePasswordLengthAttribute()
            : base(_defaultErrorMessage)
        {
        }

        public override string FormatErrorMessage(string name)
        {
            return String.Format(CultureInfo.CurrentCulture, ErrorMessageString,
                name, _minCharacters);
        }

        public override bool IsValid(object value)
        {
            string valueAsString = value as string;
            return (valueAsString != null && valueAsString.Length >= _minCharacters);
        }

        public IEnumerable<ModelClientValidationRule> GetClientValidationRules(ModelMetadata metadata, ControllerContext context)
        {
            return new[]{
                new ModelClientValidationStringLengthRule(FormatErrorMessage(metadata.GetDisplayName()), _minCharacters, int.MaxValue)
            };
        }
    }

    #endregion Validation
}

5- در پروژه مربوطه یک Controller به نام AccountController ایجاد نمایید. و کد‌های زیر را برای آنها وارد نمایید.
using System.Web.Mvc;
using System.Web.Routing;
using System.Web.Security;
using DotNetOpenAuth.Messaging;
using DotNetOpenAuth.OpenId;
using DotNetOpenAuth.OpenId.RelyingParty;
using OpenIDExample.Models;

namespace OpenIDExample.Controllers
{
    public class AccountController : Controller
    {
        private static OpenIdRelyingParty openid = new OpenIdRelyingParty();

        public IFormsAuthenticationService FormsService { get; set; }

        public IMembershipService MembershipService { get; set; }

        protected override void Initialize(RequestContext requestContext)
        {
            if (FormsService == null) { FormsService = new FormsAuthenticationService(); }
            if (MembershipService == null) { MembershipService = new AccountMembershipService(); }

            base.Initialize(requestContext);
        }

        // **************************************
        // URL: /Account/LogOn
        // **************************************

        public ActionResult LogOn()
        {
            return View();
        }

        [HttpPost]
        public ActionResult LogOn(LogOnModel model, string returnUrl)
        {
            if (ModelState.IsValid)
            {
                if (MembershipService.ValidateUser(model.UserName, model.Password))
                {
                    FormsService.SignIn(model.UserName, model.RememberMe);
                    if (Url.IsLocalUrl(returnUrl))
                    {
                        return Redirect(returnUrl);
                    }
                    else
                    {
                        return RedirectToAction("Index", "Home");
                    }
                }
                else
                {
                    ModelState.AddModelError("", "The user name or password provided is incorrect.");
                }
            }

            // If we got this far, something failed, redisplay form
            return View(model);
        }

        // **************************************
        // URL: /Account/LogOff
        // **************************************

        public ActionResult LogOff()
        {
            FormsService.SignOut();

            return RedirectToAction("Index", "Home");
        }

        // **************************************
        // URL: /Account/Register
        // **************************************

        public ActionResult Register(string OpenID)
        {
            ViewBag.PasswordLength = MembershipService.MinPasswordLength;
            ViewBag.OpenID = OpenID;
            return View();
        }

        [HttpPost]
        public ActionResult Register(RegisterModel model)
        {
            if (ModelState.IsValid)
            {
                // Attempt to register the user
                MembershipCreateStatus createStatus = MembershipService.CreateUser(model.UserName, model.Password, model.Email, model.OpenID);

                if (createStatus == MembershipCreateStatus.Success)
                {
                    FormsService.SignIn(model.UserName, false /* createPersistentCookie */);
                    return RedirectToAction("Index", "Home");
                }
                else
                {
                    ModelState.AddModelError("", AccountValidation.ErrorCodeToString(createStatus));
                }
            }

            // If we got this far, something failed, redisplay form
            ViewBag.PasswordLength = MembershipService.MinPasswordLength;
            return View(model);
        }

        // **************************************
        // URL: /Account/ChangePassword
        // **************************************

        [Authorize]
        public ActionResult ChangePassword()
        {
            ViewBag.PasswordLength = MembershipService.MinPasswordLength;
            return View();
        }

        [Authorize]
        [HttpPost]
        public ActionResult ChangePassword(ChangePasswordModel model)
        {
            if (ModelState.IsValid)
            {
                if (MembershipService.ChangePassword(User.Identity.Name, model.OldPassword, model.NewPassword))
                {
                    return RedirectToAction("ChangePasswordSuccess");
                }
                else
                {
                    ModelState.AddModelError("", "The current password is incorrect or the new password is invalid.");
                }
            }

            // If we got this far, something failed, redisplay form
            ViewBag.PasswordLength = MembershipService.MinPasswordLength;
            return View(model);
        }

        // **************************************
        // URL: /Account/ChangePasswordSuccess
        // **************************************

        public ActionResult ChangePasswordSuccess()
        {
            return View();
        }

        [ValidateInput(false)]
        public ActionResult Authenticate(string returnUrl)
        {
            var response = openid.GetResponse();
            if (response == null)
            {
                //Let us submit the request to OpenID provider
                Identifier id;
                if (Identifier.TryParse(Request.Form["openid_identifier"], out id))
                {
                    try
                    {
                        var request = openid.CreateRequest(Request.Form["openid_identifier"]);
                        return request.RedirectingResponse.AsActionResult();
                    }
                    catch (ProtocolException ex)
                    {
                        ViewBag.Message = ex.Message;
                        return View("LogOn");
                    }
                }

                ViewBag.Message = "Invalid identifier";
                return View("LogOn");
            }

            //Let us check the response
            switch (response.Status)
            {
                case AuthenticationStatus.Authenticated:
                    LogOnModel lm = new LogOnModel();
                    lm.OpenID = response.ClaimedIdentifier;
                    //check if user exist
                    MembershipUser user = MembershipService.GetUser(lm.OpenID);
                    if (user != null)
                    {
                        lm.UserName = user.UserName;
                        FormsService.SignIn(user.UserName, false);
                    }

                    return View("LogOn", lm);

                case AuthenticationStatus.Canceled:
                    ViewBag.Message = "Canceled at provider";
                    return View("LogOn");
                case AuthenticationStatus.Failed:
                    ViewBag.Message = response.Exception.Message;
                    return View("LogOn");
            }

            return new EmptyResult();
        }
    }
}

6- سپس برای Action به نام LogOn یک View می‌سازیم، برای 
Authenticate نیازی به ایجاد View ندارد چون قرار است درخواست کاربر را به آدرس دیگری Redirect کند. سپس کد‌های زیر را برای View ایجاد شده وارد می‌کنیم.
@model OpenIDExample.Models.LogOnModel
@{
    ViewBag.Title = "Log On";
}
<h2>
    Log On</h2>
<p>
    Please enter your username and password. @Html.ActionLink("Register", "Register")
    if you don't have an account.
</p>
<script src="@Url.Content("~/Scripts/jquery.validate.min.js")" type="text/javascript"></script>
<script src="@Url.Content("~/Scripts/jquery.validate.unobtrusive.min.js")" type="text/javascript"></script>
<form action="Authenticate?ReturnUrl=@HttpUtility.UrlEncode(Request.QueryString["ReturnUrl"])" method="post" id="openid_form">
<input type="hidden" name="action" value="verify" />
<div>
    <fieldset>
        <legend>Login using OpenID</legend>
        <div class="openid_choice">
            <p>
                Please click your account provider:</p>
            <div id="openid_btns">
            </div>
        </div>
        <div id="openid_input_area">
            @Html.TextBox("openid_identifier")
            <input type="submit" value="Log On" />
        </div>
        <noscript>
            <p>
                OpenID is service that allows you to log-on to many different websites using a single
                indentity. Find out <a href="http://openid.net/what/">more about OpenID</a> and
                <a href="http://openid.net/get/">how to get an OpenID enabled account</a>.</p>
        </noscript>
        <div>
            @if (Model != null)
            {
                if (String.IsNullOrEmpty(Model.UserName))
                {
                <div class="editor-label">
                    @Html.LabelFor(model => model.OpenID)
                </div>
                <div class="editor-field">
                    @Html.DisplayFor(model => model.OpenID)
                </div>
                <p class="button">
                    @Html.ActionLink("New User ,Register", "Register", new { OpenID = Model.OpenID })
                </p>
                }
                else
                {
                    //user exist
                <p class="buttonGreen">
                    <a href="@Url.Action("Index", "Home")">Welcome , @Model.UserName, Continue..." </a>
                </p>

                }
            }
        </div>
    </fieldset>
</div>
</form>
@Html.ValidationSummary(true, "Login was unsuccessful. Please correct the errors and try again.")
@using (Html.BeginForm())
{
    <div>
        <fieldset>
            <legend>Or Login Normally</legend>
            <div class="editor-label">
                @Html.LabelFor(m => m.UserName)
            </div>
            <div class="editor-field">
                @Html.TextBoxFor(m => m.UserName)
                @Html.ValidationMessageFor(m => m.UserName)
            </div>
            <div class="editor-label">
                @Html.LabelFor(m => m.Password)
            </div>
            <div class="editor-field">
                @Html.PasswordFor(m => m.Password)
                @Html.ValidationMessageFor(m => m.Password)
            </div>
            <div class="editor-label">
                @Html.CheckBoxFor(m => m.RememberMe)
                @Html.LabelFor(m => m.RememberMe)
            </div>
            <p>
                <input type="submit" value="Log On" />
            </p>
        </fieldset>
    </div>
}

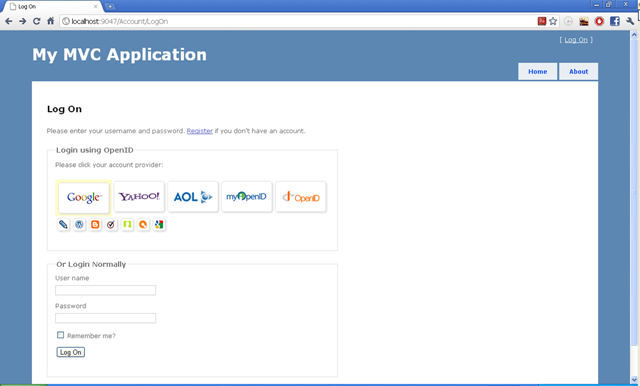
پس از اجرای پروژه صفحه ای شبیه به پایین مشاهده کرده و سرویس دهنده OpenID خاص خود را می‌توانید انتخاب نمایید.


7- برای فعال سازی عملیات احراز هویت توسط
FormsAuthentication  در سایت باید تنطیمات زیر را در فایل web.config انجام دهید.
<authentication mode="Forms">
      <forms loginUrl="~/Account/LogOn" timeout="2880" />
</authentication>
خوب تا اینجا کار تمام است و کاربر در صورتی که در سایت OpenID نام کاربری داشته باشد می‌تواند در سایت شما Login کند.
جهت مطالعات بیشتر  ودانلود نمونه کد‌های آماده می‌توانید به لینک‌های (^ و ^ و ^ و ^ و ^  و ^ و ^ ) مراجعه کنید.
کد کامل پروژه را می‌توانید از اینجا دانلود نمایید.

منبع